| Adding a new Object | Add Label | |
Each Tree node (except a Leaf) represents another Object and can have one of the three "split" types. To change the type of split, highlight the Object on the Tree (or one of its branches) and from the popup menu (right-mouse click) select the required change. The three basic "split" types are:
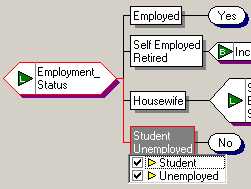
·For single-select List object nodes, this type of split can be edited to create any number of branches with any combination of the list values. By default a separate branch for each value is created.
·For multi-select List object nodes, this split results in two branches; the first branch is based on a set Comparator (= ,  ,
,  ,
,  Equality, Sub-set, Super-set, Overlap) and one or more of its values (the second branch represents "otherwise").
·For Numeric & Date type objects, this type of split results in two branches; the first branch is based on a numeric comparator (= , < , <= , > or >=) and a threshold value (the second branch represents "otherwise").
·For List type objects, this type of split results in 2 branches; the first branch is based on a Comparator and a second Object (the second branch represents "otherwise"). The comparators available for selection will depend on the type of objects being compared.
= ,  ,
,  ,
,  (Equal, Sub-set, Super-set, Overlap) for multi-select List objects
= , <> (Equal, Not-equal) for single-select List objects
= , < , <= , > , >= (Equal, Less-than, Less-than-or-equal-to, Greater-than, Greater-than-or-equal-to) for Numeric and Date type objects
If the object that you insert on the tree like this is a List type and the Node split is set to Object / Value Comparison, then you can edit how the List Values are assigned to the different branches of the tree.
All Values: This is a default single branch where all values of the attribute follow a single logic path. You can double-click on this to 'Edit Branches & Values…'.
Multi-way split: Used with List type attributes, this split will produce one branch for every corresponding value of the List attribute.
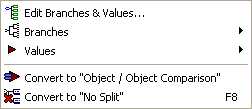
To edit the branch using the standard branch editing right-mouse click on the value of the object in the decision tree editor and select 'Edit Branches & Values…'
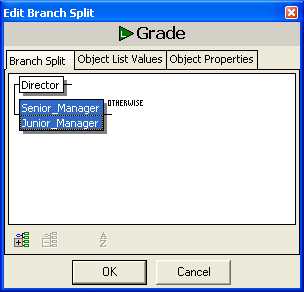
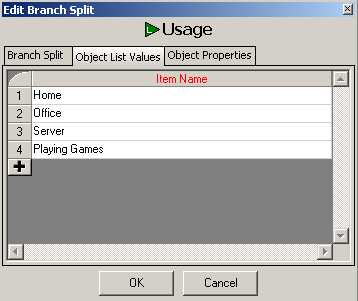
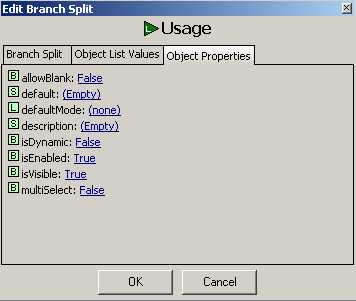
This will open up a 'Branch Split Editor' dialog for that particular object. For list objects it will show three tabs – a 'Branch Split' tab, an 'Object List Values' tab and an 'Object Properties' tab.
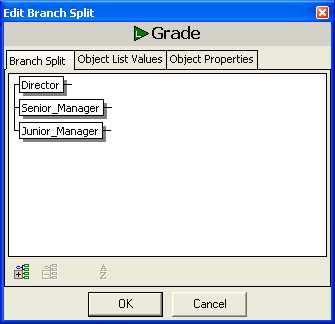
'Branch Split' tab
The 'Branch Split' tab allows values to be grouped together into the same branch by dragging the value to be required branch and dropping it there. New branches can be created using the mini icon  and empty highlighted branches can be deleted using the mini icon
  . Values within a highlighted branch can be sorted into alphabetical order by using the mini icon
  . By right clicking on a branch within the 'Branch Split' tab will produce the following menu.
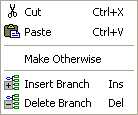
Values can be moved from one branch to another using the 'Cut' and 'Paste' options. One branch can be designated as an 'Otherwise' branch using the 'Make Otherwise' option and would show on the decision tree as 'Otherwise' instead of listing the values that would be involved in that branch (this is useful when there are a large number of values involved in one particular branch). The 'Insert Branch' and 'Delete Branch' are self-explanatory and can be reached using the keystroke shortcut of 'Ins' and 'Del' respectively.
'Object List Values' tab
The 'Object List Values' tab allows List Values to be added, renamed or deleted.
'Object Properties' tab
The 'Object Properties' tab allows the values of certain properties of the object to be edited without requiring the editor of that object to be opened separately.
Selecting the 'Alternative Branch Editing' checkbox on the 'Decision Trees' tab in the 'User Options' provides a different way of editing branch values. If this option is selected then the branch values can be selected and de-selected by clicking on the branch to bring-up its set of values with a checkbox for selecting/deselecting each value.
.